Rufus is a lightweight, free Windows program that formats a USB flash drive and copies the contents of an ISO image onto it in a way that lets a computer boot directly from that USB drive. It is most commonly used to create Windows or Linux installation media, and it is entirely free, portable, and open-source.
What Is Rufus? Overview and History
Rufus is a small, free Windows application whose sole purpose is to prepare a USB flash drive so a computer can boot from it. Instead of installing an operating system through a bulky installer wizard, Rufus reads an ISO image (a single file that contains the exact contents of an installation DVD) and writes it to a USB stick in a way that the computer's firmware recognizes as a valid boot device. The result is a bootable pendrive that can install Windows, run a Linux live session, or launch a diagnostic and recovery toolkit, all without an optical drive.
Rufus was created by French developer Pete Batard and has been maintained by him and a small group of open-source contributors for well over a decade. What began as a simple DOS bootable USB creator has grown into one of the most trusted tools in the IT world, supporting UEFI, Secure Boot, GPT and MBR partitioning, and dozens of Linux distributions in addition to every modern version of Windows. The project is hosted publicly on GitHub, and its full source code is available for anyone to inspect, audit, or compile themselves — a level of transparency that closed-source alternatives simply cannot match.
Because the rufus software is open source under the GNU General Public License, security researchers and hobbyist developers alike have reviewed its code over the years, and no hidden telemetry, adware, or malicious behavior has ever been found. This transparency, combined with the tool's tiny footprint (the executable is typically under 3 MB), is a major reason rufus.ie remains the first stop for anyone searching for a reliable rufus download.
Unlike many modern utilities, Rufus does not require installation in the traditional sense. There is no setup wizard, no background service, and no automatic startup entry. You download the executable, run it, and it opens directly. When you close Rufus, it leaves nothing running in the background — a deliberate design choice that keeps the tool fast, predictable, and easy to trust on both personal machines and locked-down enterprise workstations.
Rufus has become the de facto standard tool recommended by hardware manufacturers, Linux distribution maintainers, and IT support forums whenever someone needs to create installation media. Its popularity is reflected in search behavior too: people search for rufus usb, rufus iso, and rufus bootable usb far more than for any competing tool, a testament to how thoroughly it has become synonymous with the phrase 'bootable USB.'
Why Use Rufus Instead of Windows Media Creation Tool or Other Software
Microsoft's own Windows Media Creation Tool can create installation media, so why do so many people specifically search for rufus download instead? The answer comes down to speed, flexibility, and control. The Media Creation Tool is designed for simplicity: it downloads Windows for you and writes it with almost no configurable options. Rufus, by contrast, is built for people who already have an ISO file (downloaded separately, extracted from a DVD, or provided by an organization) and need precise control over how that ISO is written to a USB drive.
Speed is one of the most noticeable differences. Rufus writes data using low-level, highly optimized routines and typically finishes writing a full Windows ISO to a fast USB drive in a fraction of the time the Media Creation Tool takes, especially when using DD image mode. Users regularly report Rufus completing a bootable flash drive in five to ten minutes versus twenty or more with Microsoft's tool.
Flexibility is the second major advantage. Rufus supports far more than just Windows. It can create bootable pendrive media for practically any Linux distribution, DOS, FreeBSD, and various diagnostic and antivirus rescue disks. The Media Creation Tool only works with Windows, and only with the specific version Microsoft's servers decide to serve you. Rufus lets you use any ISO from any legitimate source, including older Windows 7 and Windows 10 installers that Microsoft no longer actively distributes through its own tools.
Rufus also exposes advanced settings that power users need: choice of GPT or MBR partition scheme, UEFI or Legacy BIOS targeting, FAT32/NTFS/exFAT file systems, bad block checking, persistent storage for Linux, and — notably — the ability to bypass Windows 11's TPM 2.0, Secure Boot, and RAM requirements during installation, something no Microsoft tool will ever offer.
| Feature | Rufus | Windows Media Creation Tool |
|---|---|---|
| Works with any ISO | Yes | Windows only, Microsoft-served |
| Linux support | Yes, extensive | No |
| Portable, no install | Yes | No, requires download each time |
| Windows 11 requirement bypass | Yes | No |
| Write speed | Very fast (DD mode) | Moderate |
| Partition scheme control | Full manual control | Automatic only |
For anyone who already has downloaded an ISO and simply needs it turned into working boot media as quickly and reliably as possible, rufus software is consistently the preferred choice among IT professionals, system builders, and enthusiasts.
System Requirements to Run Rufus
One of the appeal points of Rufus is how little it demands from your computer. The rufus download for windows package is tiny compared to almost any other system utility, and it runs comfortably on hardware that would struggle with heavier tools.
- Operating system: Rufus runs on Windows 7 SP1 or later (64-bit strongly recommended, though 32-bit builds exist for legacy machines). It also has a specific ARM64 build for Windows on ARM devices.
- Processor and RAM: There are no meaningful CPU or RAM requirements beyond what Windows itself needs. Rufus itself uses only a few megabytes of memory while running.
- Disk space: The executable itself requires less than 3 MB of storage. No installation directory or persistent files are created unless you explicitly save a configuration.
- USB port: A functioning USB port (USB 2.0 or USB 3.0/3.1/3.2) is required to connect the target flash drive. USB 3.0 ports and drives dramatically speed up the writing process compared to USB 2.0.
- Target USB drive: The flash drive being formatted should be at least 8 GB for most modern Windows ISOs, though older Windows 7 images can fit on 4 GB drives. For dual-layer or larger Linux distributions, 16 GB or more is recommended.
- Administrator rights: Because Rufus writes directly to a block device, it must be run with administrator privileges on Windows. It will prompt for elevation automatically.
- Internet connection: Not required to run Rufus itself, but useful because Rufus can optionally download official Windows ISOs directly within the application, and it checks for its own updates online.
Because there is no heavyweight installer, Rufus is often the tool of choice on technician laptops, repair-shop workstations, and diagnostic USB kits, where minimizing installed software and dependencies matters. The low system requirements also mean Rufus works fine on decade-old laptops being repaired or repurposed — a common real-world use case where a fully-featured but heavy tool would be impractical.
It's worth noting that Rufus itself does not need to run from the same architecture as the ISO you are writing. You can use a 64-bit Windows machine to create a 32-bit Windows 7 installer, or use an x64 Rufus build to prepare a Linux ARM image, as long as you select the matching options during the process.

How to Download Rufus Safely
Because Rufus is such a popular search term, third-party download sites frequently bundle it with adware, fake installers, or outdated versions. The only way to guarantee you're getting a clean, unmodified rufus free download is to get it directly from the official source.
The official website is rufus.ie, and the dedicated downloads page is https://rufus.ie/downloads/. This is the canonical, developer-maintained distribution point, and it is also mirrored on the project's official GitHub releases page, which is useful for verifying file hashes and reading version-specific release notes.
When you visit the downloads page you'll typically see two main types of builds:
- Standard EXE (installer-style, but still portable): A single executable that you can double-click and run immediately — no actual installation wizard, no Start Menu entries, no background services.
- Rufus Portable: A version explicitly labeled "Portable" that never writes settings to the registry and can be run from a USB drive, cloud folder, or read-only location. This is the preferred choice for technicians who carry a toolkit USB drive and don't want to leave traces on client machines.
Steps for a safe rufus download for pc:
- Open a browser and navigate directly to rufus.ie — type the address rather than clicking a search ad, since sponsored results sometimes lead to lookalike domains.
- Click through to the Downloads section and choose the latest stable version listed at the top.
- Select either the standard executable or the Portable build depending on your preference.
- Once downloaded, right-click the file, choose Properties, and confirm the Digital Signatures tab shows a valid signature from the developer.
- Optionally compare the SHA-256 checksum listed on the downloads page against the file you received, using a tool like CertUtil (built into Windows) or PowerShell's Get-FileHash cmdlet.
- Run the executable. Windows SmartScreen may show a brief warning for new releases before reputation builds up — this is normal for small independent developer tools and does not indicate malware.
Avoid downloading rufus usb tools from generic "software download" aggregator sites, torrent trackers, or unofficial mirrors, even if they claim to offer a "faster" or "premium" version. Rufus has always been, and remains, completely free — there is no legitimate paid version, and any site charging for it is not official.
Download Rufus for Free v4.15 · 2026-06-30
Beta builds
Previous versions
- v4.14 — 2026-04-30
- v4.13 — 2026-02-17
- v4.12 — 2026-01-30
- v3.22 (Last version compatible with Windows 7)
- v2.18 (Last version compatible with Windows XP and Windows Vista)
All downloads on rufus.ie → · GitHub releases (pbatard/rufus) →
Full Version Archive — Index of /downloads/
152 historical builds (v3.5 → v4.15)
Name Last modified Size Description
Parent Directory -
rufus-4.15.exe 2026-06-30 12:03 1.9M Rufus 4.15
Browse the live archive on rufus.ie → · GitHub releases (pbatard/rufus) →
Step-by-Step: Creating a Bootable Windows 11 USB with Rufus
Creating Windows 11 installation media is one of the most common reasons people search for rufus windows 11 or rufus bootable usb. Here is the complete process from start to finish.
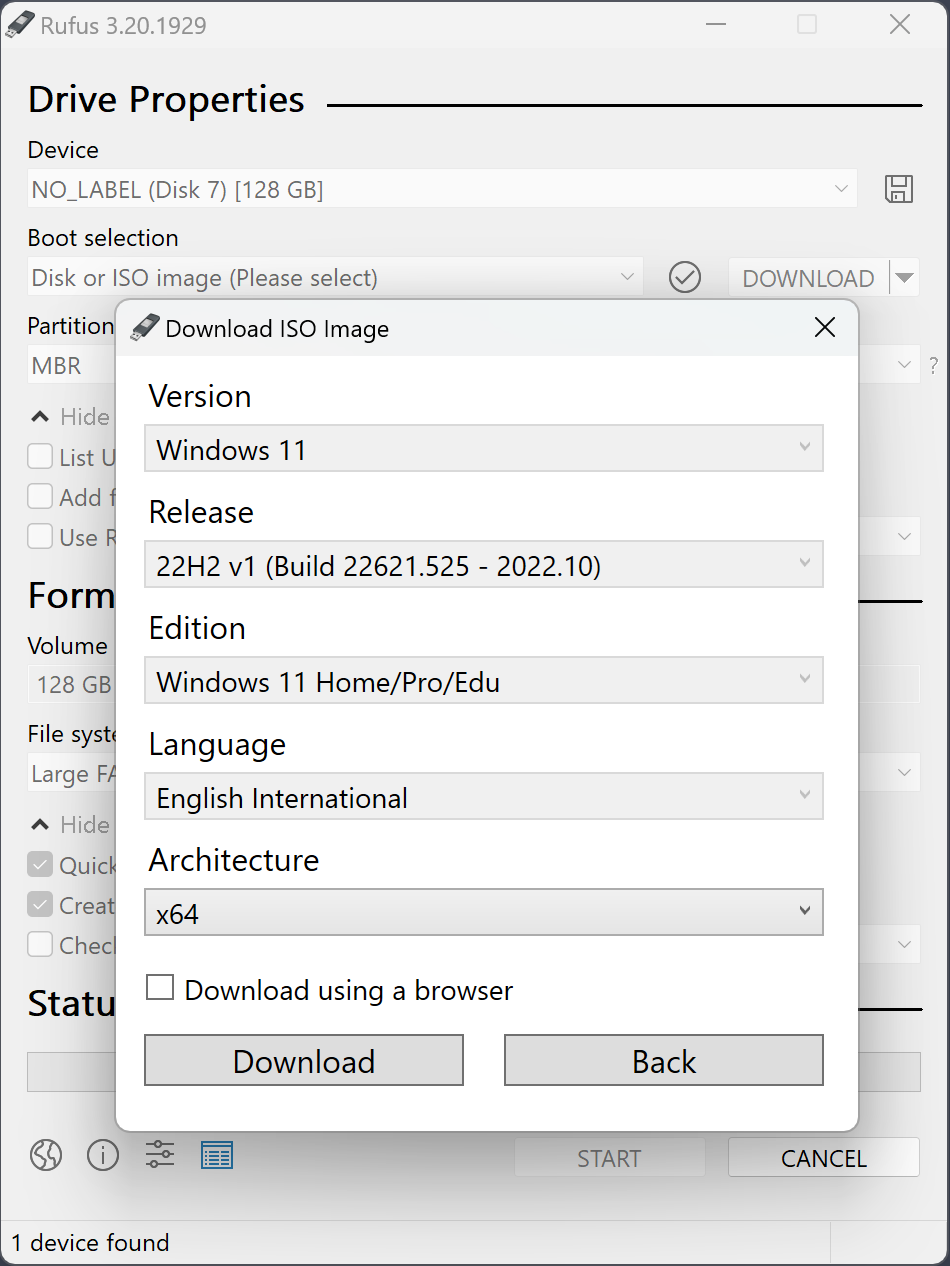
- Get a Windows 11 ISO. Download the official ISO from Microsoft's software download page, or let Rufus fetch it for you directly — recent Rufus versions include a "Download" button next to the boot selection dropdown that retrieves official Windows ISOs without needing the Media Creation Tool.
- Insert your USB drive. Use a drive of at least 8 GB. Back up any existing data first, because the entire drive will be erased.
- Launch Rufus as administrator. Windows will prompt for elevation; approve it.
- Select your device. Under "Device," choose the correct USB drive from the dropdown. Double-check the drive letter and size to avoid accidentally wiping the wrong disk.
- Select the ISO. Click "Select" (or "Disk or ISO image") next to "Boot selection" and browse to your downloaded Windows 11 ISO file.
- Choose partition scheme. For modern computers, select GPT partition scheme with UEFI target system. This is required for Secure Boot-enabled machines.
- Handle the requirements prompt. If your Windows 11 ISO detects that the target hardware may not meet TPM 2.0, Secure Boot, or RAM requirements, Rufus will show a customization dialog offering to remove these Windows 11 requirement checks, along with options like skipping the Microsoft account requirement during setup.
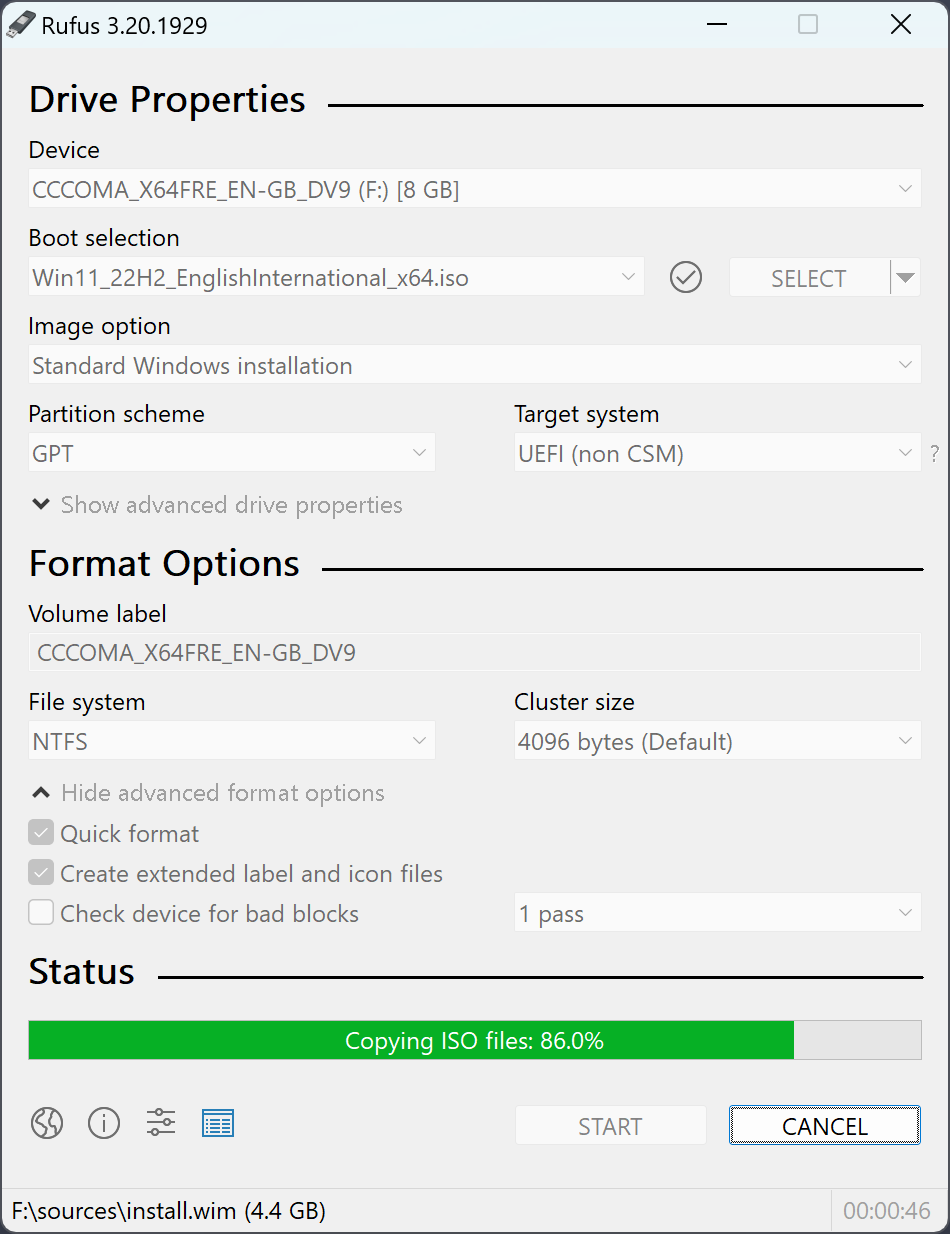
- Choose file system. NTFS is recommended for Windows 11 due to install.wim files that often exceed the FAT32 4 GB file-size limit. Rufus automatically handles this by splitting large files if you do choose FAT32.
- Click START. Confirm the warning that all data on the drive will be destroyed.
- Wait for completion. The process usually takes five to fifteen minutes depending on USB speed and ISO size.
- Boot from the USB. Restart the target PC, enter the boot menu (commonly F12, F10, Esc, or Delete depending on manufacturer), and select the USB drive to begin Windows 11 setup.
This workflow makes Rufus one of the fastest and most reliable ways to prepare a rufus windows 11 installer, especially for technicians who need to reinstall Windows 11 on hardware that technically falls short of Microsoft's official minimum specifications.
Step-by-Step: Creating a Bootable Windows 10 USB with Rufus
Even with Windows 11 available, huge numbers of users still search for rufus windows 10 and rufus for windows 10 because Windows 10 remains widely deployed in businesses, schools, and on older hardware that can't meet Windows 11's requirements. The process with Rufus is nearly identical to Windows 11, with a few differences worth noting.
- Obtain the Windows 10 ISO. Download it from Microsoft's official Windows 10 download page, or use the built-in ISO download feature in newer Rufus versions.
- Insert and select your USB drive in Rufus (8 GB minimum recommended, 4 GB is technically sufficient for some builds).
- Select the ISO file under Boot selection.
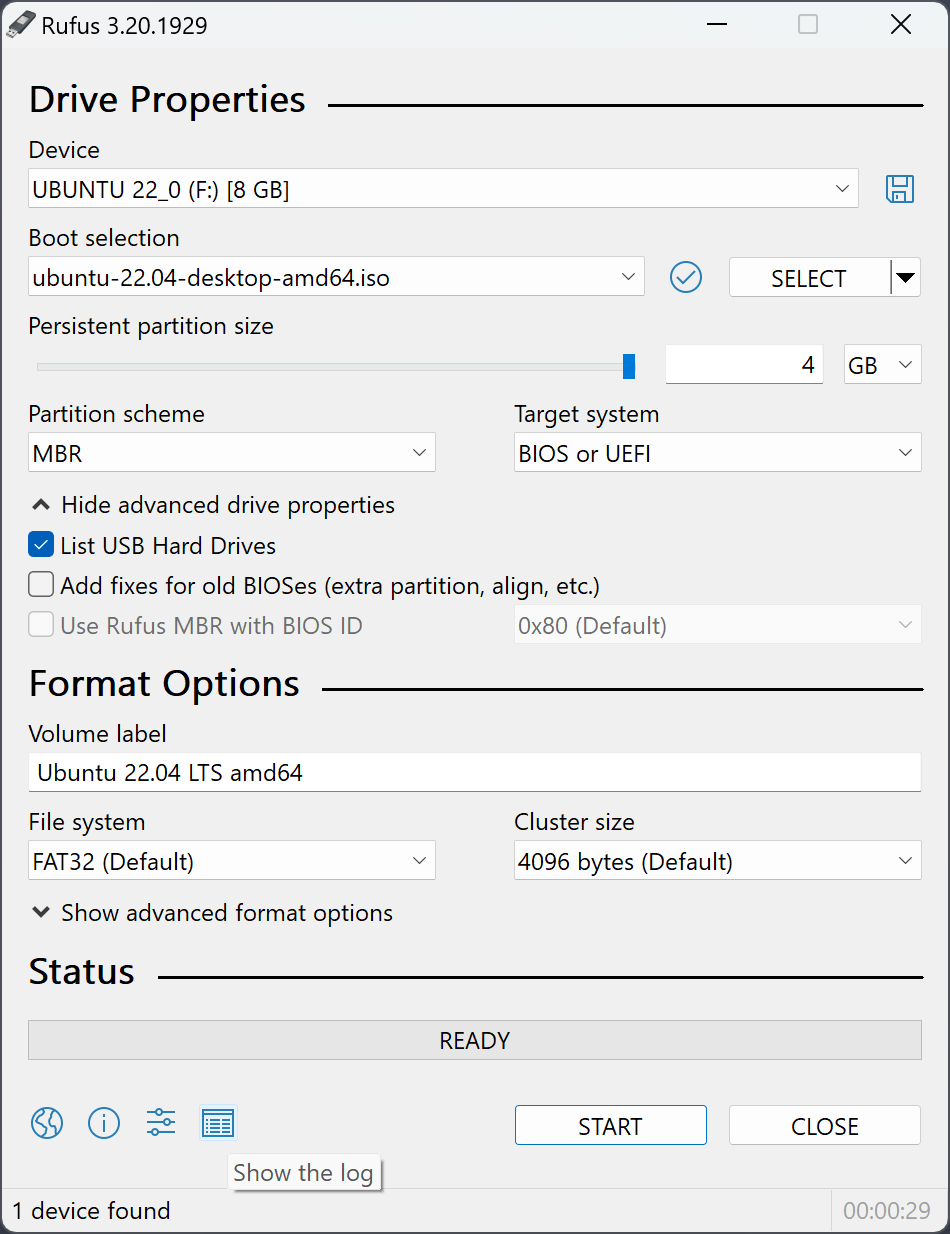
- Choose the partition scheme based on your target machine. For a modern UEFI PC, use GPT. For an older BIOS-only computer, use MBR with a BIOS or UEFI target system, since Windows 10 still supports plenty of Legacy BIOS hardware that Windows 11 has effectively dropped.
- Pick your file system. NTFS is generally safest for Windows 10 ISOs given their file sizes, though Rufus can split files automatically if you prefer FAT32 for maximum compatibility with older UEFI firmware.
- Leave cluster size at default unless you have a specific reason to change it.
- Click START and confirm the data-loss warning.
- Boot from the finished USB on your target machine via its boot menu.
Because Windows 10 doesn't impose TPM or Secure Boot requirements the way Windows 11 does, the process is generally more straightforward — there's no need for the requirement-bypass dialog that Windows 11 media triggers. This makes rufus windows 10 media creation one of the simplest and most predictable workflows in the entire application, and it's a major reason so many people still specifically search for "download rufus" when planning to reinstall or upgrade a Windows 10 machine, refurbish older laptops, or set up a fleet of budget office computers that don't have Windows 11-capable hardware.
For businesses managing multiple machines, Rufus also supports saving a preset configuration so identical Windows 10 USB drives can be recreated quickly across several sticks without re-selecting every option each time.
Step-by-Step: Creating a Bootable Linux USB (Ubuntu, Fedora, Debian, Mint)
Rufus for Linux users doesn't mean Rufus runs on Linux — it remains a Windows application — but it is one of the best tools available specifically for creating Linux installation and live media from a Windows PC. Whether you're installing Ubuntu, Fedora, Debian, or Linux Mint, the process is fast and reliable.
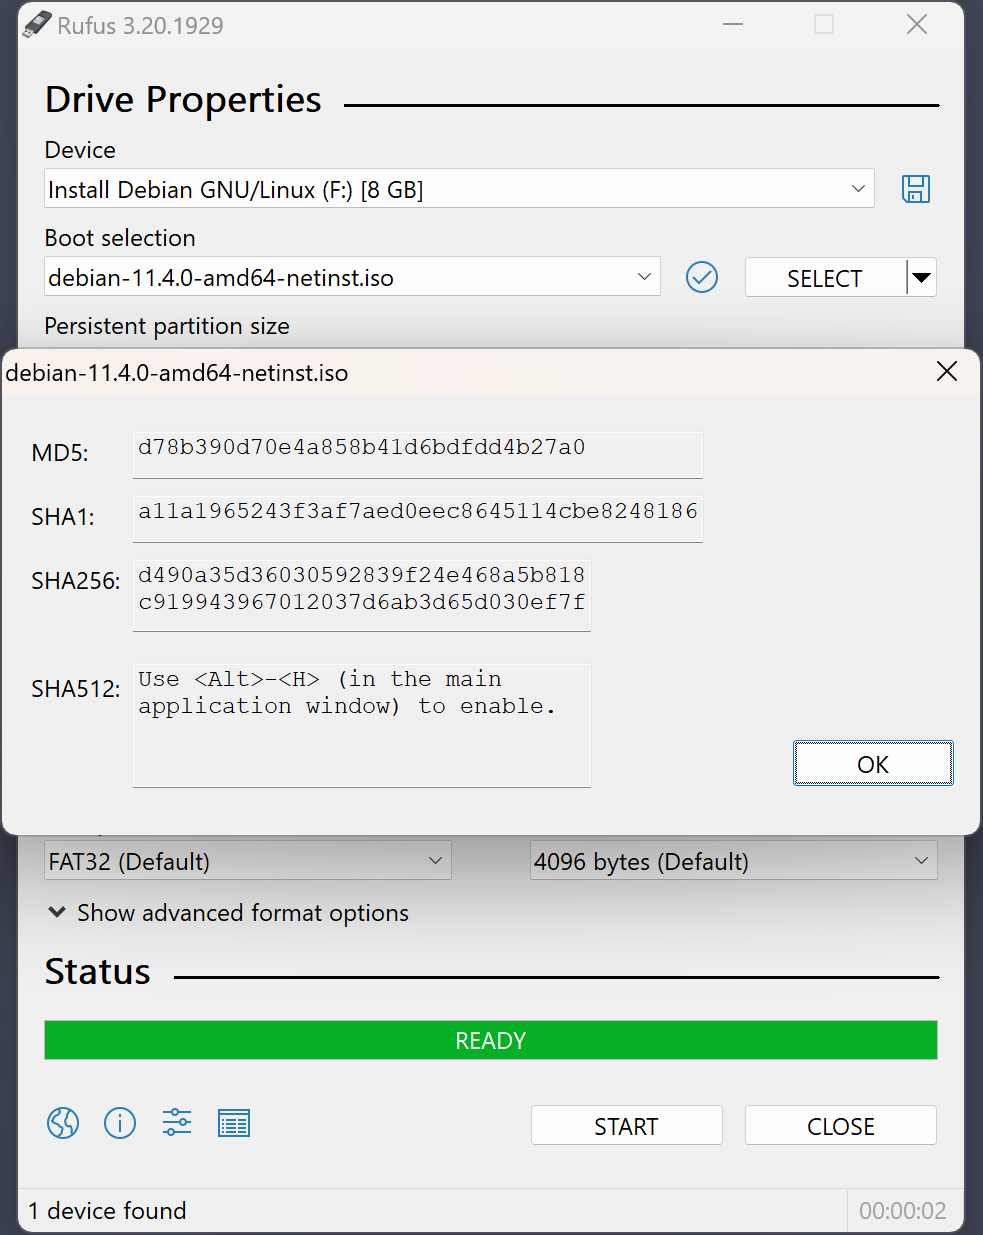
- Download the distribution's ISO from its official website (ubuntu.com, fedoraproject.org, debian.org, or linuxmint.com). Always verify the checksum provided by the distribution to ensure the download wasn't corrupted.
- Insert a USB drive of at least 4-8 GB, depending on the distribution's size (Ubuntu and Fedora typically need 6-8 GB when factoring in the live environment).
- Open Rufus and select the device.
- Select the ISO under Boot selection. Rufus will automatically detect that it's a Linux ISO and adjust available options accordingly.
- Choose the image-writing mode. For most modern Linux ISOs (Ubuntu, Fedora, Mint), Rufus will prompt you to choose between "ISO Image mode" and "DD Image mode." DD mode does a raw sector-by-sector copy and is required for many current Linux hybrid ISOs; ISO mode extracts and rebuilds the filesystem and allows more customization like persistence.
- Set the partition scheme. GPT with UEFI is standard for modern machines; choose MBR with BIOS for older systems, particularly older Debian installs on legacy hardware.
- Enable persistence if desired. When using ISO Image mode on a supported distribution, Rufus shows a "Persistent partition size" slider, letting you allocate space so changes made during a live session are saved across reboots.
- Click START and wait for the write and verification process to complete.
- Boot the target computer from the USB via its boot menu to reach the live Linux environment or installer.
A quick reference for typical settings by distribution:
| Distribution | Typical mode | Notes |
|---|---|---|
| Ubuntu | DD Image mode | Hybrid ISO, usually forces DD mode automatically |
| Fedora | DD Image mode | Similar hybrid ISO structure to Ubuntu |
| Debian | ISO or DD depending on build | Netinst images are small and fast to write |
| Linux Mint | DD Image mode | Persistence supported on many releases via ISO mode |
Because Linux ISOs vary in how they're built, Rufus intelligently detects the correct mode most of the time and only asks you to choose when there's genuine ambiguity, making it a dependable one-stop tool for bootable pendrive creation across the Linux ecosystem.
UEFI vs Legacy BIOS Boot Explained
One of the most confusing choices in Rufus for newcomers is the "Target system" setting, which determines whether the USB drive is prepared for UEFI or Legacy BIOS booting. Understanding the difference is essential to creating working boot media.
Legacy BIOS is the traditional firmware interface used by PCs for decades before roughly 2012. It boots from the Master Boot Record (MBR) of a disk, uses 16-bit real-mode code during startup, and has no built-in security validation of what it boots. It's simple, universally compatible with old hardware, but limited — it can't natively boot from GPT-partitioned disks larger than 2 TB and lacks modern security features.
UEFI (Unified Extensible Firmware Interface) is the modern replacement, standard on essentially all PCs manufactured since the early-to-mid 2010s. UEFI boots from a dedicated EFI System Partition, supports GPT disks beyond 2 TB, offers faster boot times, and enables Secure Boot — a security feature that verifies the digital signature of boot loaders before allowing them to run, helping prevent bootkit malware.
In Rufus, the Target system option is often set automatically based on the partition scheme you choose (GPT typically pairs with UEFI, MBR typically pairs with BIOS), though Rufus does allow certain combinations like MBR with UEFI for specific compatibility scenarios on older UEFI implementations that don't fully support GPT.
- Use UEFI when installing on any computer purchased after roughly 2012, when you want Secure Boot support, or when installing Windows 11 (which effectively requires UEFI).
- Use Legacy BIOS only when working with genuinely old hardware, or when a specific Linux distribution or diagnostic tool explicitly requires BIOS-mode booting.
- Check "both" compatibility by selecting GPT with UEFI (CSM) target system in Rufus, which can allow booting on systems supporting Compatibility Support Module fallback — useful when you're not entirely sure of the target machine's firmware type.
Getting this setting wrong is one of the most common reasons a freshly created bootable flash drive doesn't appear in a computer's boot menu at all, or appears but fails partway through installation. If your USB drive isn't detected during boot, the first thing to check is whether the Target system setting in Rufus matches the firmware mode the destination computer is actually using — which you can usually confirm by entering the computer's BIOS/UEFI setup screen and looking for a "Boot Mode" or "UEFI/Legacy" setting.
GPT vs MBR Partition Schemes: Which to Choose
Alongside UEFI vs BIOS, Rufus asks you to choose a partition scheme: GPT (GUID Partition Table) or MBR (Master Boot Record). This choice determines how partition information is stored on the drive and has real compatibility implications.
MBR is the older standard, dating back to the original IBM PC. It supports a maximum of four primary partitions (or three primary plus one extended containing multiple logical partitions) and a maximum disk size of 2 TB due to its 32-bit sector addressing. It's compatible with virtually every PC ever made, including very old BIOS-only systems.
GPT is the modern standard, part of the UEFI specification. It supports up to 128 partitions by default, disks larger than 2 TB (up to theoretical exabyte scales), and includes redundant partition table copies plus CRC checksums for better data integrity. GPT is required for booting Windows in UEFI mode and is mandatory for Windows 11 installations on GPT system disks.
| Factor | GPT | MBR |
|---|---|---|
| Max disk size | Effectively unlimited (exabytes) | 2 TB |
| Max partitions | 128 | 4 primary (or 3+extended) |
| Firmware pairing | UEFI | Legacy BIOS |
| Windows 11 requirement | Required for system disk | Not supported for Win 11 install |
| Data redundancy | Yes, backup partition table | No |
Practical guidance for choosing in Rufus:
- Choose GPT for any modern computer (2013 or newer), any Windows 11 installation, and any drive over 2 TB.
- Choose MBR only for genuinely old BIOS-only computers, or specific legacy diagnostic and recovery tools that explicitly require it.
- When unsure, GPT with UEFI is the safest modern default for the vast majority of users creating a rufus bootable usb today, since nearly all hardware sold in the last decade supports it.
It's worth remembering that the partition scheme applies to the USB drive itself during the boot process, not necessarily to the internal hard drive or SSD you'll eventually install the operating system onto — though for Windows, it's strongly recommended (and for Windows 11, effectively required) that both the installation media and the target system disk use matching UEFI/GPT configuration to avoid boot failures after installation completes.
ISO Image Mode vs DD Image Mode Explained
When writing certain ISOs, especially many Linux distributions, Rufus presents a choice between "Write in ISO Image mode (Recommended)" and "Write in DD Image mode." This decision confuses many first-time users, but the underlying concept is straightforward once explained.
ISO Image mode treats the source file as a filesystem image. Rufus extracts the files from the ISO and writes them onto a freshly formatted partition on the USB drive, then makes that partition bootable. This approach lets Rufus customize the resulting drive — for example, injecting boot-time file modifications to bypass Windows 11 requirement checks, or configuring a persistent storage partition for Linux live sessions. Because the USB drive ends up with a standard, readable file system, you can also browse its contents afterward in Windows File Explorer.
DD Image mode (named after the Unix "dd" command-line utility) performs a raw, sector-by-sector clone of the ISO file directly onto the USB drive, bit for bit, exactly as it exists in the source image. This is required for certain "hybrid" ISOs — common with many current Linux distributions like Ubuntu — that are built with an embedded partition table and boot code that only works correctly when written exactly as-is. Trying to use ISO mode on an ISO that truly requires DD mode can result in a USB drive that appears to boot but then fails partway through, or doesn't boot at all.
Key practical differences:
- Customization: ISO mode allows Rufus's advanced options (Windows 11 bypass, persistence, etc.); DD mode does not, since it copies the image exactly as provided.
- Speed: DD mode is often marginally faster since it's a direct block copy with no filesystem-level processing.
- Post-write accessibility: Drives written in ISO mode remain browsable as a normal FAT32/NTFS volume; drives written in DD mode may show as an unrecognized or differently-labeled partition in Windows afterward, which is normal and doesn't affect bootability.
- Which one to pick: For Windows ISOs, Rufus almost always uses ISO mode automatically (and often doesn't even show the prompt). For many Linux ISOs, Rufus detects hybrid images and either forces DD mode or strongly recommends it — trust Rufus's default recommendation unless you have a specific reason to override it.
If you ever see errors describing a rufus iso as "unsupported" or notice the image fails to boot despite a successful write, switching between these two modes — when Rufral offers the choice — is one of the first troubleshooting steps worth trying, since a mismatch between image structure and write mode is a common root cause of unbootable pendrive creation attempts.
File Systems in Rufus: FAT32, NTFS, and exFAT
Rufus lets you choose the file system used on the resulting bootable USB drive, and this choice has real consequences for compatibility, maximum file size, and boot behavior. The three main options are FAT32, NTFS, and exFAT.
FAT32 is the oldest and most universally compatible file system. Nearly every UEFI firmware implementation can read FAT32 EFI System Partitions natively, making it the default and safest choice for maximum boot compatibility across different computer brands and firmware versions. Its major limitation is a hard 4 GB maximum individual file size — problematic because modern Windows installation images contain an install.wim (or install.esd) file that frequently exceeds 4 GB. Rufus works around this cleverly by automatically splitting the oversized WIM file into smaller .swm segments when FAT32 is selected for a Windows ISO, reassembling them transparently during setup.
NTFS has no meaningful file size limit for this purpose and handles large install.wim files without any splitting or extra processing, making the write process slightly simpler for big Windows ISOs. Its downside is that older or budget UEFI firmware sometimes lacks native NTFS boot support, occasionally causing "no bootable device found" errors on certain motherboards. Most computers made in the last several years handle NTFS boot media without issue, but it's a small compatibility risk to be aware of, especially with off-brand or older UEFI implementations.
exFAT combines some benefits of both — no 4 GB file size limit like NTFS, but with less overhead than NTFS — and is well suited for flash media generally. However, boot support for exFAT in firmware is less universal than FAT32, so it's used less frequently for OS installation media and more often for general-purpose bootable pendrive scenarios like carrying large diagnostic tool images.
| File system | Max file size | Boot compatibility | Best for |
|---|---|---|---|
| FAT32 | 4 GB (Rufus auto-splits WIM) | Excellent, most universal | Maximum compatibility, older firmware |
| NTFS | No practical limit | Good on modern UEFI | Large Windows ISOs, simplicity |
| exFAT | No practical limit | Moderate | General-purpose large-file USB use |
Recommendation: for Windows 10 and Windows 11 media aimed at recent hardware, either FAT32 (with automatic splitting, Rufus's default recommended approach) or NTFS work well. If you've had boot detection problems on a specific machine, try switching file systems as a troubleshooting step — this single setting resolves a surprising number of "USB not booting" reports.
Persistent Storage and Linux Persistence with Rufus
A standard Linux live USB normally resets to its original state every time you reboot — any files you save, settings you change, or software you install during a live session vanish once you restart. Rufus solves this with a persistent storage feature that carves out additional space on the USB drive to save changes between sessions.
When you select certain Linux ISOs in ISO Image mode, Rufus displays a "Persistent partition size" slider beneath the main options. Dragging this slider allocates a portion of your USB drive's remaining capacity (after the space needed for the live OS itself) as a dedicated persistence partition, commonly using a casper-rw file or a separate ext-based partition depending on the distribution's persistence mechanism.
Practical considerations for using persistence effectively:
- Drive size matters. A 4 GB drive leaves virtually no room for persistence after the OS itself. For meaningful persistent storage — enough to save documents, install a few extra applications, and keep browser history — a 16 GB or 32 GB drive is strongly recommended.
- Not all distributions support it equally. Ubuntu-based distributions generally have the most mature and well-tested persistence support in Rufus. Some distributions, particularly rolling-release or minimal images, may not support the persistence mechanism Rufus implements at all.
- DD mode disables persistence. Since persistence relies on Rufus modifying the filesystem structure after extraction, it is only available in ISO Image mode. If a distribution forces DD mode, persistence won't be an available option.
- Performance depends on USB speed. Persistent changes are written back to the flash drive constantly during use, so a slow USB 2.0 drive will make a persistent live session feel noticeably sluggish compared to a fast USB 3.0 or 3.1 drive.
- It's not a full installation. Persistence is intended for portable, try-before-you-install use cases or for a portable toolkit you carry between machines — it is not a substitute for a proper full disk installation if you plan to use Linux as your primary daily system long-term.
To set it up: select your Linux ISO, ensure ISO Image mode is active, move the persistent partition size slider to your desired allocation (leaving Rufus to automatically calculate the remaining space for the live system itself), then click START as normal. The resulting bootable pendrive will prompt to either start fresh or continue with previously saved changes each time you use it on a supporting distribution, giving you a genuinely useful "Linux in your pocket" experience.
Windows To Go and Portable Windows Installs
Beyond simple installation media, Rufus can also create a fully functional, bootable Windows environment that runs directly from the USB drive itself — a concept known as Windows To Go. Unlike a normal installation USB, which only launches a setup wizard that installs Windows onto your computer's internal drive, a Windows To Go drive lets you boot an already-configured, working copy of Windows straight from the flash drive on virtually any compatible PC, leaving the host computer's internal storage completely untouched.
To create this kind of portable install with Rufus:
- Select your Windows ISO under Boot selection as usual.
- In the "Image option" dropdown (visible for certain Windows images), choose "Windows To Go" instead of the standard "Standard Windows installation."
- Choose GPT/UEFI or MBR/BIOS based on target machine compatibility, keeping in mind Windows To Go works best on UEFI systems.
- Use a high-quality, fast USB drive — ideally USB 3.0 or better, and ideally a drive specifically rated for sustained read/write workloads rather than a cheap consumer flash drive, since the entire operating system will be running from it continuously.
- Click START and let Rufus build the environment, which takes longer than a standard installer since it's deploying a complete working OS image rather than just installer files.
Once complete, you can boot the drive on a compatible computer's boot menu and get a genuine, working desktop Windows environment — complete with your own installed applications and settings if you set them up and then continue using the same drive — all without touching the host machine's internal disk. This is particularly valuable for IT professionals who need a consistent, known-good working environment they can plug into different client machines, for security-conscious users who don't want to leave any trace on a borrowed computer, or for emergency recovery scenarios where a computer's internal drive has failed but you still need a working Windows desktop.
Some important caveats: performance depends heavily on the USB drive's actual sustained read/write speed — a budget flash drive will feel noticeably slower than an internal SSD. Not every option (like certain OEM activation methods tied to a specific motherboard) works identically under Windows To Go. And because it's officially a discontinued Microsoft feature in newer Windows editions, Rufus's implementation using standard installation images has become the primary practical way most users create this kind of portable, drive-independent Windows environment today.
Bypassing Windows 11 TPM, Secure Boot, and RAM Requirements
Windows 11's official minimum requirements — TPM 2.0, Secure Boot capability, a supported CPU generation, and 4 GB of RAM — locked out a significant number of otherwise perfectly capable computers from upgrading. Rufus became one of the most widely used tools specifically because it offers a built-in, no-extra-steps way to bypass these checks during installation media creation.
When you select a Windows 11 ISO in Rufus and the software detects it's a Windows 11 image, it automatically opens a customization dialog (sometimes called "Windows User Experience" options) with several checkboxes, most notably:
- "Remove requirement for 4GB+ RAM, Secure Boot and TPM 2.0" — this is the core bypass toggle that patches the installer's hardware detection so setup proceeds even on unsupported CPUs, missing TPM chips, or systems with Secure Boot disabled.
- "Remove requirement for an online Microsoft account (and gaia.dll if needed for the local account workaround)" — lets you complete setup with a local account rather than being forced to sign in online.
- "Disable data collection (Skip privacy questions)" — streamlines the out-of-box experience by skipping some of Microsoft's telemetry and privacy prompts.
- "Create a local account with username" — some Rufus versions let you pre-fill the local account name to speed up unattended-style installs.
Technically, Rufus achieves this by modifying the installation media's setup process — primarily by adjusting registry-based bypass keys and appconfig files that Windows Setup itself checks during the compatibility assessment phase, similar to workarounds Microsoft has semi-officially acknowledged exist, but bundled into one clean checkbox instead of requiring manual registry edits during setup.
Important considerations before relying on this feature:
- Microsoft has stated that installing Windows 11 on unsupported hardware may result in a lack of guaranteed driver support and could affect eligibility for some future updates, though in practice most users on modestly unsupported hardware (e.g., missing TPM 2.0 chip but otherwise capable CPU) report normal update behavior for extended periods.
- This bypass is intended for scenarios like older but still-capable business laptops, custom-built PCs with slightly older but perfectly fast CPUs, and virtual machines — not as a way to run Windows 11 on genuinely incapable, ancient hardware.
- Always keep backups before doing an in-place upgrade on hardware that falls outside official support, since it is technically an unsupported configuration.
This single feature is one of the most searched-for reasons people look up rufus windows 11 specifically, since it solves a real, common frustration that Microsoft's own tools flatly refuse to address.
Common Rufus Errors and Troubleshooting
While Rufus is generally reliable, a handful of recurring issues account for the vast majority of support questions. Here's how to diagnose and fix the most common ones.
USB drive not detected in Rufus: First, try a different USB port, ideally directly on the motherboard's rear I/O rather than a front-panel header or hub, since some hubs and front connectors have power or signal issues with certain drives. Confirm the drive appears in Windows Disk Management (accessible via right-click on This PC → Manage → Disk Management) — if it doesn't appear there either, the problem is the drive or port, not Rufus. Try a different USB drive to rule out a failing one.
"ISO is not bootable" or "unsupported ISO" errors: This usually means the downloaded ISO file is corrupted or incomplete. Re-download it and verify the checksum against the value published by the official source (Microsoft, or the Linux distribution's website). Occasionally this also happens with unusual or repackaged ISOs that don't follow standard structure — always use ISOs from official, trusted sources.
Write failures midway through the process: Often caused by a failing or counterfeit USB drive. Cheap, unbranded flash drives — especially ones bought from marketplace sellers at suspiciously low prices — are sometimes mislabeled with false higher capacities, causing writes to silently fail once they exceed real available space. Run Rufus's built-in bad block check (covered in the next section) to identify this.
Drive doesn't appear in the target computer's boot menu: This is almost always a Target system (UEFI vs BIOS) or partition scheme (GPT vs MBR) mismatch relative to how the destination computer's firmware is configured. Enter the destination PC's BIOS/UEFI setup and confirm its boot mode, then match your Rufus settings accordingly. Also confirm Secure Boot settings if using UEFI — some Linux distributions require Secure Boot to be disabled, or need a signed bootloader to work with it enabled.
"Windows cannot be installed on this drive" during setup: This typically indicates a GPT/MBR mismatch between the installation media and the target internal disk, not a Rufus problem per se — the internal disk's partition style needs to match the boot mode being used (GPT disk for UEFI boot, MBR disk for Legacy BIOS boot).
Rufus itself won't open or crashes immediately: Confirm you're running a build appropriate for your Windows version and architecture (x64 vs ARM64), and that your antivirus hasn't quarantined a file — check quarantine logs, as overly aggressive heuristic antivirus engines occasionally flag disk-writing utilities as suspicious even when clean.
Extremely slow write speeds: Usually the USB drive itself, particularly older or budget drives with slow NAND flash. Try DD Image mode if available (typically faster than ISO mode for eligible images), use a USB 3.0 port and drive, and avoid USB hubs during the write process.
If problems persist after these steps, the official Rufus GitHub Issues page and the community forums linked from rufus.ie are the best places to search for or report specific, unusual error messages, since the developer and community actively track and resolve edge cases.
Verifying and Checking the USB Drive After Writing
After Rufus finishes writing an image, it's good practice — especially for older or unfamiliar flash drives — to verify the drive is genuinely reliable before depending on it for an important installation or recovery task.
Built-in bad block check: Rufus includes a "Check device for bad blocks" option, accessible via the checkbox near the bottom of the main window before you click START. When enabled, you can choose how many passes to run:
- 1 pass (Quick scan): Fast, catches obvious problems.
- 2 passes: Uses two different test patterns for a more thorough check.
- 3-4 passes: The most exhaustive testing, using multiple patterns (0x55, 0xAA, and pseudo-random data) to catch subtle memory cell degradation. This takes considerably longer — potentially hours for large, slow drives.
This test writes patterns across the entire drive and reads them back to confirm data integrity, which is particularly valuable for catching counterfeit flash drives that report a false, inflated capacity (a surprisingly common scam with cheap drives bought from unofficial marketplace sellers). If Rufus reports bad blocks on a drive that's supposed to be new, the safest action is to stop using that drive for anything important and, if possible, return or replace it.
Automatic post-write verification: Beyond the dedicated bad-block scan, Rufus also performs basic integrity checks as part of a normal write operation, confirming the write process completed without I/O errors reported by Windows.
Manual verification after the fact: You can also independently confirm a drive is bootable by:
- Checking that Windows File Explorer correctly shows the expected volume label and that key files/folders (like sources, boot, or EFI on a Windows drive) are present and appropriately sized.
- Testing the drive in a virtual machine (VirtualBox or VMware) configured to boot from USB passthrough, which lets you confirm bootability without touching real target hardware first.
- Using the destination computer's boot menu to at least confirm the drive is recognized and begins loading, even if you cancel out before a full install.
For anyone building a bootable pendrive that will be reused repeatedly — such as an IT technician's permanent toolkit drive — running at least a single-pass bad block check periodically (not necessarily every single time) is a worthwhile habit, since flash memory does degrade with heavy use over months and years, and catching early failure signs before a drive is needed in an emergency is far better than discovering it mid-repair.
Rufus Command-Line and CLI Usage for Advanced Users
While Rufus is primarily known as a graphical application, it does support a limited set of command-line parameters that IT professionals and enterprise users can leverage for scripted or semi-automated deployment scenarios, and it supports saving/loading configuration profiles for repeatable builds.
Basic command-line switches: Rufus can be launched from a command prompt or script with parameters that control its startup behavior, including specifying a target language, launching directly with a particular ISO pre-selected, or running in a mode that skips certain update-check behavior. Common examples include:
rufus.exe -w 5— waits a specified number of seconds for USB devices to be detected before the interface becomes interactive, useful for scripted environments where a drive might be inserted programmatically or via a hotplug event.rufus.exe -i "path\to\image.iso"— pre-loads a specific ISO image path into the Boot selection field on launch, saving a manual browse step.rufus.exe -l en-US— forces a specific interface language rather than relying on auto-detection from system locale.
INI-based configuration: Rufus supports a rufus.ini file (used automatically by the Portable build) that stores previously used settings, window preferences, and update-check behavior, letting technicians pre-configure a known-good settings profile once and carry it along with the portable executable for consistent behavior across multiple machines.
Enterprise and IT deployment considerations: Because Rufus doesn't offer a full unattended, silent, zero-click command-line mode for the entire write operation (unlike some enterprise imaging tools), it's best used in IT contexts as a fast, manual-but-efficient tool for one-off or small-batch bootable pendrive creation, rather than for fully automated mass deployment across hundreds of drives simultaneously. For that kind of large-scale automated deployment, organizations often pair Rufus for initial "golden image" USB creation with separate disk-cloning or duplication hardware/software to physically replicate the finished drive across many blank USB sticks afterward.
Logging and diagnostics: Rufus includes a built-in log window (accessible via the small icon in the interface, or through a keyboard shortcut) that records detailed technical output of every step in the write process — device detection, partition creation, file copy progress, and any errors encountered. This log can be saved to a text file and is invaluable when reporting bugs to the developer or diagnosing why a particular drive or ISO combination failed, since it includes low-level details not shown in the simplified progress bar.
For most individual users, the graphical interface alone is sufficient, but knowing these command-line and configuration options exist is valuable for system administrators building repeatable, documented processes around rufus software as part of a broader IT toolkit.
Rufus Alternatives: How It Compares to Other Tools
Rufus isn't the only bootable USB creation tool available, and depending on your specific use case, an alternative might occasionally suit you better. Here's an honest comparison of the most commonly mentioned competitors.
| Tool | Pros | Cons |
|---|---|---|
| Rufus | Extremely fast, huge feature set, Windows 11 bypass, open source, tiny download, supports nearly every OS/ISO type | Windows-only application (though it creates media for any OS); no native Mac/Linux host version |
| balenaEtcher | Clean, simple, cross-platform (Windows/Mac/Linux host), good for beginners | Slower writes than Rufus, fewer advanced options, no Windows 11 requirement bypass, larger download |
| Ventoy | Install once, then just drag-and-drop multiple ISOs onto the drive without reformatting each time; great for a multi-boot toolkit drive | Different underlying philosophy (multi-boot menu vs single dedicated image); some picky ISOs need extra plugins to work correctly |
| Windows Media Creation Tool | Official Microsoft tool, straightforward for average users doing a simple Windows installation | Windows-only ISOs, no Linux support, no requirement bypass, slower, less configurable, must download from Microsoft servers directly |
| UNetbootin | Long-established, lightweight, cross-platform host support | Development has slowed significantly over the years, less reliable with modern hybrid Linux ISOs, less polished interface |
When Rufus is the best choice: If you're on Windows and need maximum speed, granular control over partition scheme and file system, Windows 11 requirement bypassing, or support for the widest possible range of ISO types (Windows, Linux, DOS, FreeBSD, diagnostic tools), Rufus remains the strongest all-around option and the reason it dominates search volume for terms like rufus download and rufus bootable usb.
When an alternative might suit you better: If you frequently need to carry multiple different bootable ISOs on a single drive and switch between them without reformatting each time, Ventoy's drag-and-drop multi-boot approach is genuinely more convenient than repeatedly re-running Rufus for each individual image. If you're working primarily from a Mac or Linux host machine rather than Windows, balenaEtcher's native cross-platform support is more directly usable without needing Wine or a Windows virtual machine. And if you specifically want Microsoft's own guided, no-decisions-needed process for a completely standard Windows installation and don't need any customization at all, the Media Creation Tool remains adequate for that narrow use case.
Many experienced users, in practice, keep both Rufus and Ventoy in their toolkit — Rufus for building precisely configured single-purpose installation drives (especially Windows with requirement bypasses), and Ventoy for a general-purpose multi-ISO recovery and utility drive they don't need to rebuild often.
Rufus Version History and Notable Recent Changes
Rufus has been in continuous, active development for well over a decade, with Pete Batard and contributors regularly shipping new releases that track changes in Windows, UEFI firmware behavior, and the broader Linux distribution ecosystem. While exact version numbers and specific fixes change frequently, several themes define the tool's evolution that are worth understanding.
Early years: Rufus began as a straightforward DOS-bootable USB creation tool, well before UEFI was common, focused primarily on simplicity and reliability for BIOS-era systems.
UEFI and GPT era: As UEFI firmware and GPT partitioning became standard across the PC industry, Rufus added comprehensive support for both, including the ability to target UEFI specifically, handle Secure Boot-signed bootloaders, and correctly build GPT-based bootable pendrive media for large-capacity Windows installations.
Windows 11 requirement bypass era: Following Windows 11's controversial hardware requirements (TPM 2.0, Secure Boot capability, supported CPU lists), Rufus quickly became one of the first widely adopted tools to offer a clean, built-in way to bypass these checks during installation media creation — a feature that has been refined and adjusted across multiple releases as Microsoft has occasionally tweaked its own setup validation logic in response.
Direct ISO download integration: More recent versions of Rufus added the ability to fetch official Windows ISOs directly from within the application itself, eliminating a separate manual download step through a browser and reducing the chance of users accidentally grabbing a modified or fake ISO from an untrustworthy source.
Ongoing Linux compatibility updates: As Linux distributions periodically restructure their ISO formats (moving between traditional and hybrid image structures, adjusting how persistence works, or changing bootloader signing), Rufus releases regularly include updated detection logic to correctly handle new versions of Ubuntu, Fedora, Debian, Mint, and other popular distributions without requiring users to manually work around structural quirks.
Interface refinements and localization: Over the years, Rufus has expanded its interface translations to cover dozens of languages, improved its dark mode and high-DPI display support, and streamlined its options layout to keep the tool approachable for casual users while still exposing advanced settings for power users who need them.
Checking your version: Rufus displays its version number directly in the title bar and About dialog, and the application includes an automatic update-check feature (which can be disabled in settings for privacy-conscious or offline environments) that notifies you when a newer release is available on rufus.ie. Because Windows and Linux boot processes do occasionally change in ways that affect compatibility, it's generally good practice to keep Rufus reasonably current rather than relying on a build that's several years old, particularly when working with very recent Windows 11 feature updates or newly released Linux distribution versions.
Is Rufus Safe? Security, Virus Scans, and Verification
Given how much system-level access a disk-writing tool like Rufus requires (administrator privileges, direct access to raw storage devices), it's entirely reasonable to ask whether it's actually safe to use. The short answer is yes, provided you download it from the official source — and there's substantial evidence backing that conclusion.
Open-source transparency: The complete Rufus source code is publicly available on GitHub under the GNU General Public License. Anyone — security researchers, hobbyist developers, or curious users — can read exactly what the program does, compile it themselves from source, and compare their own build against the official binary. This level of transparency is fundamentally different from closed-source utilities where you must simply trust the vendor's claims about what the software does internally.
Digital signatures: Official Rufus executables are digitally signed by the developer. You can verify this yourself in Windows by right-clicking the downloaded file, selecting Properties, and checking the Digital Signatures tab — a valid, unbroken signature chain confirms the file hasn't been tampered with since it was signed by the legitimate publisher.
Checksum verification: The official rufus.ie downloads page publishes SHA-256 checksums for each release. Security-conscious users, particularly in enterprise or IT environments, can independently compute the checksum of their downloaded file (using PowerShell's Get-FileHash or the built-in CertUtil tool) and compare it against the published value to guarantee byte-for-byte integrity.
Virus scan track record: Rufus is regularly scanned by major antivirus engines and multi-engine services, and consistently comes back clean from reputable, up-to-date scanners. Occasionally, a brand-new release triggers a temporary false-positive flag from one or two heuristic-based engines simply because the file is new and hasn't built up "reputation" yet with cloud-based reputation systems — this is a known, common occurrence for small independent developer tools generally, not a sign of an actual problem, and such flags are typically cleared within days as the file's reputation score updates across vendor databases.
Why third-party sources are the real risk: The legitimate safety concerns around "rufus download" searches almost always trace back to unofficial mirror sites, download aggregators that wrap installers with bundled adware, or fake lookalike domains designed to catch typos of rufus.ie. These sites have, on occasion, distributed modified builds containing unwanted bundled software. The core Rufus application itself, sourced from rufus.ie or its official GitHub releases page, has an excellent, long-standing security track record.
Best practices for staying safe: Always type rufus.ie directly rather than clicking search ads; verify the digital signature after downloading; prefer the Portable build when you want zero registry footprint; and keep the application updated to benefit from the latest security and compatibility fixes. Following these simple habits, Rufus remains one of the most trustworthy, well-vetted utilities in its category, which is precisely why it has earned such enduring popularity among both casual home users and professional IT technicians worldwide.
Frequently Asked Questions
Is Rufus really free?
Yes, Rufus is completely free with no hidden costs, trial limitations, or premium tiers. It is released as open-source software, and the developer has never charged for it. Any website claiming to sell a "premium" or "pro" version of Rufus is not legitimate — the only official source is rufus.ie, where every feature is available to every user at no cost, permanently.
Where can I download Rufus safely?
The only official source is rufus.ie, specifically the downloads page at https://rufus.ie/downloads/, which is also mirrored on the project's official GitHub releases page. Avoid third-party download aggregator sites, as they sometimes bundle adware or distribute outdated versions. Always verify the digital signature or published SHA-256 checksum after downloading for extra assurance.
Does Rufus work on Windows 7?
Yes, Rufus supports Windows 7 SP1 and later as a host operating system for running the tool itself, and it can also be used to create Windows 7 installation media from an ISO if you need to reinstall or repair an older Windows 7 machine. Note that very recent Rufus releases have gradually reduced testing focus on Windows 7 as a host OS, so if you're running Rufus on Windows 7 itself, slightly older Rufus versions may offer better compatibility.
Can Rufus create a bootable USB for Linux?
Yes, Rufus fully supports creating bootable Linux media for distributions including Ubuntu, Fedora, Debian, Linux Mint, and many others. It automatically detects the correct writing mode (ISO or DD Image mode) for most distributions and even supports persistent storage on many Linux live USB drives, letting you save files and settings between reboots.
What's the difference between Rufus's standard version and the Portable version?
Both versions have identical functionality. The standard version can optionally save some settings to the Windows registry, while the Portable version stores all settings in a local INI file and never touches the registry, making it ideal for carrying on a USB drive between different computers without leaving any trace or requiring administrator setup changes on each machine.
Can Rufus bypass Windows 11's TPM and Secure Boot requirements?
Yes. When Rufus detects a Windows 11 ISO, it automatically offers a customization dialog with an option to remove the TPM 2.0, Secure Boot, and 4GB RAM requirement checks from the installation process, allowing Windows 11 to be installed on hardware that doesn't officially meet Microsoft's minimum requirements. This is one of the most popular reasons people search specifically for rufus windows 11.
Should I choose GPT or MBR in Rufus?
For any modern computer made after roughly 2012, and for any Windows 11 installation, choose GPT with UEFI as the target system. Only choose MBR with Legacy BIOS if you're working with genuinely old hardware or a specific tool that explicitly requires it. You can check your target computer's firmware mode in its BIOS/UEFI setup screen if you're unsure.
Why does Rufus ask me to choose between ISO Image mode and DD Image mode?
Some ISO files, particularly many modern hybrid Linux distribution images, are built as raw disk images that must be copied byte-for-byte using DD Image mode to boot correctly. Others, especially Windows ISOs, are extracted and rebuilt as a proper file system using ISO Image mode, which also allows Rufus to add customizations like the Windows 11 requirement bypass or Linux persistence. Rufus usually detects and recommends the correct option automatically.
How do I fix "USB drive not detected" in Rufus?
Try a different USB port, ideally directly on your motherboard's rear I/O panel rather than a front-panel connector or hub. Confirm the drive appears in Windows Disk Management to rule out a hardware failure. If it doesn't appear there either, try a different USB drive entirely, since a failing or dying drive is a common culprit.
What file system should I use in Rufus, FAT32 or NTFS?
FAT32 offers the broadest boot compatibility across different computer firmware and is generally recommended for maximum reliability; Rufus automatically splits large Windows installation files to work around FAT32's 4 GB file size limit. NTFS avoids the need for splitting and works fine on most modern UEFI systems, but has slightly less universal firmware-level boot support, particularly on older or budget motherboards.
Can Rufus check my USB drive for bad blocks or fake capacity?
Yes, Rufus includes a built-in "Check device for bad blocks" option with configurable pass counts (1 to 4 passes). This test writes and reads back data across the entire drive to catch failing memory cells and, importantly, can expose counterfeit flash drives that falsely report a larger capacity than they actually have, a common issue with very cheap unbranded USB drives.
Does Rufus support persistent storage for Linux live USBs?
Yes, for many Linux distributions written in ISO Image mode, Rufus provides a persistent partition size slider that lets you allocate extra space on the drive to save files, settings, and installed software between reboots, effectively turning a temporary live session into a semi-permanent portable Linux environment.
Is Rufus safe, and does it contain viruses?
Rufus, when downloaded from the official rufus.ie website or its official GitHub releases page, is safe and consistently scans clean across major antivirus engines. It is fully open-source, meaning its code is publicly auditable, and official releases are digitally signed with published checksums for independent verification. Risks only arise from downloading modified copies via unofficial third-party mirror or aggregator sites.
What is the minimum USB drive size I need for Rufus?
For most modern Windows 10 or Windows 11 ISOs, an 8 GB USB drive is the practical minimum, though 16 GB or larger provides comfortable headroom. Some older Windows 7 ISOs can fit on drives as small as 4 GB. Linux distributions vary, but 8 GB is generally safe, and if you plan to enable persistent storage, 16 GB or 32 GB is recommended for meaningful extra space.
Can I use Rufus to create a portable Windows To Go drive?
Yes, Rufus supports creating a Windows To Go installation for certain Windows images, letting you boot a fully working Windows desktop environment directly from the USB drive on compatible computers, without installing anything to the host machine's internal storage. For best performance, use a fast USB 3.0 or higher drive, since the entire operating system runs directly from it.
Get Rufus and Build Your Bootable USB Now
Free, portable, no installation required.
Download Rufus Now →Read This Guide in Another Language
English
English guide
Português (Brasil)
Portuguese (Brazil) guide
Español
Spanish guide
Deutsch
German guide
Français
French guide
Italiano
Italian guide
Русский
Russian guide
Türkçe
Turkish guide
日本語
Japanese guide
繁體中文
Chinese (Traditional) guide
Português
Portuguese guide
Українська
Ukrainian guide
한국어
Korean guide
العربية
Arabic guide
Bahasa Indonesia
Indonesian guide
简体中文
Chinese (Simplified) guide
Tiếng Việt
Vietnamese guide
Polski
Polish guide
ไทย
Thai guide
Magyar
Hungarian guide
Nederlands
Dutch guide
Română
Romanian guide
Čeština
Czech guide
বাংলা
Bengali guide
Ελληνικά
Greek guide
Svenska
Swedish guide
Dansk
Danish guide
Български
Bulgarian guide
עברית
Hebrew guide
Српски
Serbian guide
Suomi
Finnish guide
Slovenčina
Slovak guide
Norsk bokmål
Norwegian guide
فارسی
Persian guide
Hrvatski
Croatian guide
Slovenščina
Slovenian guide
Eesti
Estonian guide
Català
Catalan guide
粵語
Cantonese guide
Azərbaycan
Azerbaijani guide